If you're new to Asterisk, you can spend many hours and even days figuring out how things work before you get something working. And then as soon as you have it working, you'll get slammed by hackers trying to break in. I recently spent those hours and days getting asterisk working. So I have written a quick guide, this one for a connection to Nexmo, where you can sign up for a free account and use it as a SIP trunk to get going.
A FEW ASSUMPTIONS
- You are using Ubuntu, preferably 18.04 or greater. If you're using another distro, you may need to tweak some commands. For example, you may need to use
iptablesinstead ofufw. The general ideas presented here should work for any Linux distro, though. - You are basically familiar with the
bashcommand line, for example, how to install and update software, move in and out of root context usingsudo, edit files usingviornanoor some other editor, and some experience withufwwould be helpful but not necessary. - You have an external domain name for the server where you'll be installing it. I use the dynamic domain service at noip.com to do this for free. This is not required, you can use the IP address in a pinch, but it's free, not hard to set up, and convenient to have, so do it.
- The server you're installing Asterisk on is at a different IP address than the softphone you're connecting to it. This is absolutely not required. You can have them both use the same IP -- which you likely are -- but the instructions below were written with this setup in mind, so you may need to tweak slightly. You can also avoid security concerns by doing all of this inside a firewall, but I wanted remote access, and you probably will too.
OTHER RESOURCES
The link from Stack Overflow here was the first thing I found that started making sense, and you'll see I ended up with configuration that is not much different than is described here. But I sure did have to read a lot of docs before I got it working.
The documentation from Nexmo was a good starting point, but it was confusing to me because I didn't know where to make the changes (sip.conf), and there is no mention of the changes that need to go into extensions.conf. Easy stuff for an Asterisk guy, but it took me too long to figure out, so here's my guide where I make it obvious.
There are numerous links throughout this post which point to helpful resources, like voipbl -- that was a fun one to discover when I was trying to get the system secure.
ASTERISK INSTALLATION
Do not try to install Asterisk from source unless you know what you're doing. I tried that because I wanted the latest version, and I've done this kind of installation many times before, so thought I would be fine. I ended up spending DAYS trying all kinds of ways of installing it before I reverted to the easy answer using apt. Apt-get currently installs version 13. It's extremely stable, and unless you need the latest features, it's great for our purposes. (If you're curious about what kind of obstacles I encountered, I first started on Windows Linux Subsystem, and got everything installed up to the point that I needed to configure the service. Only then did I discover WLS does not have a way to enable services using systemd. Weird, but took me too long to figure that one out, because it doesn't exactly say "Error: Microsoft has replaced systemd without telling you." I didn't realize at the time there are workarounds, being frustrated by the end of a long day with little accomplished. Other attempts, even without using WLS, failed for similar reasons and I spent a lot of time with nothing to show.) With apt, the whole thing installs smoothly within minutes and you can get on with other time-killing things.
sudo apt install asterisk
After it is installed, you may notice a couple minor errors when you check status. I wrote a blog post about them here. You could also just ignore them, which I probably should have done, and eventually learned to do. Asterisk can get grumpy, but keeps working.
SECURITY
You have to have some kind of security or you will get hacked soon after your asterisk is up and running. But fail2ban is not secure enough, even with voipbl, and secast's installation and documentation for Ubuntu will frustrate a serious guru. I eventually gave up on both when I remembered I could just whitelist the IP address I'm coming from using ufw, as shown below. (If you need to connect from a random IP Address once you get everything working, or have multiple endpoints and other such concerns, then look at the fail2ban and voipbl or even the free version of secast, which is the recommended approach if you can get it installed.)
Just use ufw for now. It's easy and reliable, blocking everything except trusted machines. Note, the first 6 IP Addresses below are Nexmo (see sip.conf below). The last one will contain the IP Address you're using for your softphone. I find ifconfig.me to be the friendliest of the External IP tools. You can run curl ifconfig.me for a pleasantly succinct answer to the question. Once you know that, do the following:
sudo ufw allow from 173.193.199.24 to any port 5060 proto udp sudo ufw allow from 174.37.245.34 to any port 5060 proto udp sudo ufw allow from 5.10.112.121 to any port 5060 proto udp sudo ufw allow from 5.10.112.122 to any port 5060 proto udp sudo ufw allow from 119.81.44.6 to any port 5060 proto udp sudo ufw allow from 119.81.44.7 to any port 5060 proto udp sudo ufw allow fromto any port 5060 proto udp
CONFIGURING NEXMO
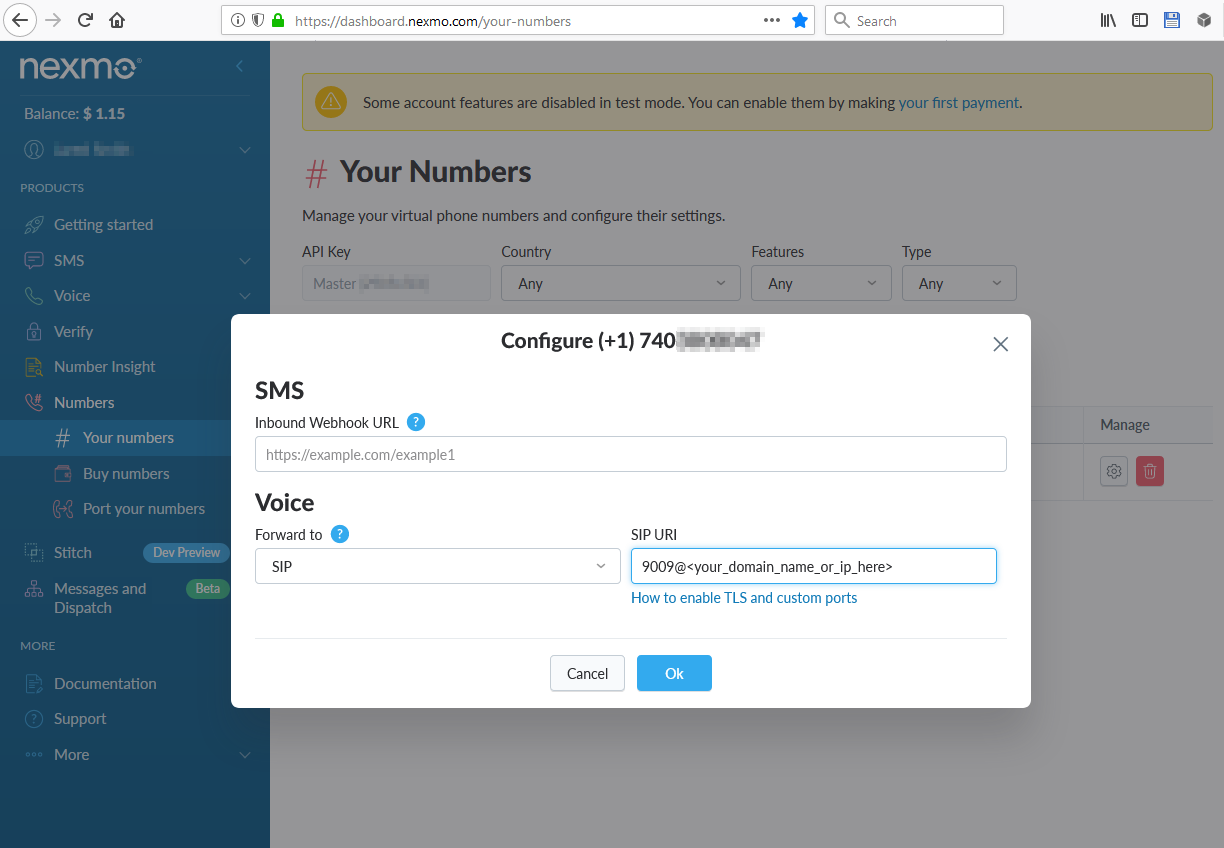
I looked at all their competitors, and Nexmo seems to have the best combination of power and simplicity. I'm using Twilio for another leg of this project -- and I like it -- but it's more complicated than Nexmo, in my opinion. So... go sign up for an account with Nexmo if you don't already have one. Go to "Your Numbers" and click on the gear icon to configure where the (default) phone number points to. See the screenshot below, it should have all the information you need. Change the Forward to SIP and point the URI to the extension you will configure later in sip.conf. For example, I used "9009." Note you do not need to pay Nexmo for this to work. You can do that after you're happy with everything working, so it's nice that they provide this kind of testing for free. Others do, also, so feel free to use another SIP trunk if you feel the need.
CONFIGURING ASTERISK
Turns out to be rather simple. You'll configure two files: /etc/asterisk/sip.conf and /etc/asterisk/extensions.conf. Simply replace them with the following. You can save the default files to sip.conf.orig and extensions.conf.orig if you want to come back to them later, as they're both loaded with lots of information. But also overwhelming for a newbie.
nano /etc/asterisk/extensions.conf
[general]
autofallthrough=yes

[globals]

[nexmo-sip1]
exten => _X.,1,Dial(SIP/${EXTEN},30)

[nexmo-sip2]
exten => _X.,1,Dial(SIP/${EXTEN}@nexmo)
and nano /etc/asterisk/sip.conf
[general] registerattempts=0 nat=yes srvlookup=yes externip=fromdomain= localnet=192.168.1.0/255.255.255.0 ; may need to change to 10.0.0.0/255.255.255.0 for some local networks qualify=no transport=udp canreinvite=no allowguest=no alwaysauthreject=yes register => : @sip.nexmo.com ; for example: register => 12345Z:UQWERUE@sip.nexmo.com context=nexmo-sip1 ; inbound configuration [nexmo-sip] fromdomain=sip.nexmo.com type=peer context=nexmo insecure=port,invite nat=no allow=ulaw allow=alaw allow=G729 dtmfmode=rfc2833 [nexmo-sip-01](nexmo-sip) ; these IP Addresses can change over time, make sure you have the most recent host=173.193.199.24 [nexmo-sip-02](nexmo-sip) host=174.37.245.34 [nexmo-sip-03](nexmo-sip) host=5.10.112.121 [nexmo-sip-04](nexmo-sip) host=5.10.112.122 [nexmo-sip-05](nexmo-sip) host=119.81.44.6 [nexmo-sip-06](nexmo-sip) host=119.81.44.7 ;outbound configuration [nexmo] username= host=sip.nexmo.com defaultuser= fromuser= fromdomain=sip.nexmo.com secret= type=peer context=nexmo-sip1 insecure=port,invite qualify=yes nat=no ;Add your codec list here. ;Note: Use "ulaw" for US only, "alaw" for the rest of the world. disallow=all allow=ulaw dtmfmode=rfc2833 [ ] ; must be numeric only. (asterisk handles alphanumeric, but nexmo doesn't) type=peer context=nexmo-sip2 host=dynamic secret= qualify=no [ ] ; this is your virtual number, with its area code and prefix, like 19001234567 type=peer context=nexmo-sip2 host=dynamic secret= qualify=no
SOFTPHONE INSTALLATION
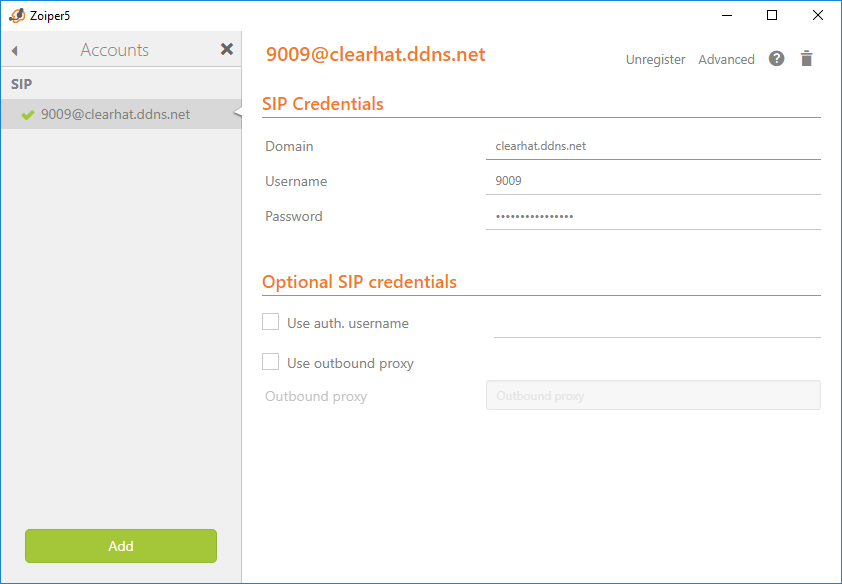
You can use any of the many available, I chose Zoiper because I've used it for other development and find the free version to be a good, simple, dev tool that will give and take calls all day long without a complaint. It installs easily, and here is a screenshot to help you with the straightforward configuration you need. (Note I'm not obfuscating information on this screenshot because you can only get into the system if you're coming from a whitelisted domain, as explained above.)
IT SHOULD WORK NOW
Now everything is configured. Do the following at the command line, then register your softphone. You should now be able to call your virtual number from any phone line, and it will ring at your softphone. And vice-versa, you should be able to call any number from your softphone. After this point, you should be able to happily learn everything the rest of these components, having the initial "hello world" completed.
service asterisk restart asterisk -rvvvvv
Hope this helps someone. Let me know if you find any errors or have better ideas.
1 From James Free -
How does 9009 (Nexmo numbers page) link up to your SIP configuration file?