Coming into FreeBSD anew from the Linux world. I'm happy with it as a server, no changes needed. I like the much-more-secure ambiance. But now experimenting with it as a desktop, I've already decided I like sudo, bash, and nano better than su, sh, and ee. And I want Gnome.
At this point, I've installed it a dozen times (several times on bare metal laptop that did not have the correct hardware for displays to work) and only finally got it working in VirtualBox by installing FreeBSD 12 and tweaking the display settings in an unexpected manner.
(Gnome in 13 on VirtualBox has not yet worked for me, even though I have tried lots of options over several days, lots of searching for resolutions. It appears according to online tutorials that it works for others. Or does it? The VMSVGA-to-VboxSVGA fix for the black screen mentioned below is not mentioned by those how-tos, and is rather obscure, which is one of the reasons I'm writing this now, so others can find it more easily.)
Here is what worked for me, beginning with a fresh install of FreeBSD from the version 12 ISO, as documented here [freebsdfoundation.org] (short version), here [freebsdfoundation.org] (more complete but still brief) and here [docs.freebsd.org] (very long detailed official version).
Start by going into root:
su -
(enter root password. Note the "-" runs login scripts and puts you into root's home folder instead of remaining where you are in the file tree)
Update package manager, as usual:
pkg update
pkg upgrade
During installation, when creating your non-root admin user, you're asked to add the new user to groups. This is a good time to put your user into the wheel group. ("invite {username} into other groups? []: wheel"). If you did not do this during installation, run the following command to add your user to the wheel group:
pw groupmod wheel -m {username}
Install sudo, start visudo:
pkg install sudo
visudo
Within the visudo interface that got installed with sudo, scroll down toward the bottom, find, and uncomment these two lines to enable sudo:
%wheel ALL=(ALL) ALL
%sudo ALL=(ALL) ALL
Use {Esc} :wq! {Enter} to write and quit vi
Install nano:
pkg install nano
Install bash:
pkg install bash
Set bash as default shell for your user:
chsh -s /usr/local/bin/bash {username}
grep {username} /etc/passwd
(That last line will show you that you successfully changed the shell for your user).
Install bash tab completion:
pkg install bash-completion
Add the following to your user's ~/.bashrc (nano /home/username/.bashrc):
[[ $PS1 && -f /usr/local/share/bash-completion/bash_completion.sh ]] && \
. /usr/local/share/bash-completion/bash_completion.sh
Install Gnome (note this installs > 450 items so it takes a while to install):
pkg install gnome-desktop gdm xorg gnome3-lite
Yes, you can install gnome3 instead of gnome3-lite, but (at least in FreeBSD 13) you'll need to use the ports method, and since it has a much larger footprint, by default it's not as secure as gnome3-lite. The tradeoff is that with gnome-3 lite, you need to manually install editors, browsers, etc. I'm good with that; if you prefer the larger footprint, go ahead and use gnome3 instead of gnome3-lite.
The basic gnome3 package you just installed isn't very friendly when it comes to logins, so let's use lightdm and its greeter to give us a nice login screen:
pkg install lightdm lightdm-gtk-greeter lightdm-gtk-greeter-settings
Install Virtualbox guest addition packages if you haven't already:
pkg install virtualbox-ose-additions
Update rc.conf with new config items for Gnome and VirtualBox:
nano /etc/rc.conf
Add the following:
gnome_enable="YES"
moused_enable="YES"
dbus_enable="YES"
hald_enable="YES"
gdm_enable="YES"
lightdm_enable="YES"
vboxguest_enable="YES"
vboxservice_enable="YES"
To help with mode switching between command line and graphical interface, add this line to the top of the loader.conf file:
nano /boot/loader.conf
kern.vty=vt
Gnome expects a proc entry in fstab, so nano /etc/fstab and add the following line:
proc /proc procfs rw 0 0
It will look somewhat like this:

Now you're ready to reboot:
reboot
So far, this is pretty much what other tutorials show for installing FreeBSD inside VirtualBox. So if this works for you, good. But if you get the black screen upon logging in like I did, here's the fix:
Got the Black Screen of Death within Gnome on VirtualBox?
First, if you don't already know, you can hit HOSTKEY+F1 to get a command prompt when you're at the black screen (Host Key is typically Right-Ctrl). From there you can gracefully shutdown or run other commands.
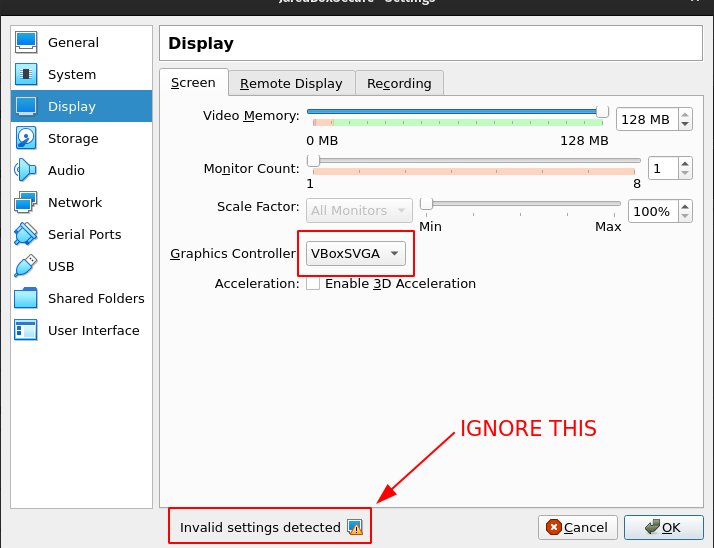
The following fix took a long time for me to find, so I hope search engines made this easier for you to find. See the screenshot below for details.
Shut down the black screen, one way or another. Go to your VirtualBox settings for the new FreeBSD image. Then go to Display, and select VboxSVGA instead of the default VMSVGA. That's it.
You'll see a warning telling you that invalid settings are detected, and this is not recommended. Ignore that warning (see the link above for confirmation of that fact). Now start the machine again, and you should soon be in regular ol' Gnome, ready to play. I assume you can toggle 3D Acceleration on this same screen if you want, but I'm not using graphics intensely enough to do that, so I left it unchecked for now.
Also you may note that I increased the video memory to 128 MB, which is pocket change these days.