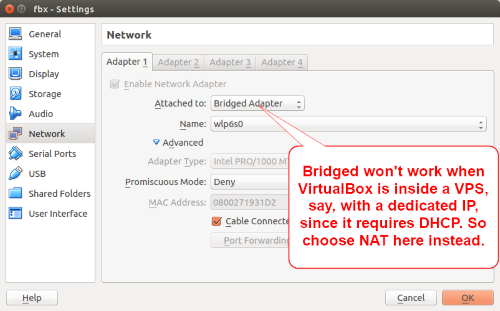
Normally when installing FreedomBox inside VirtualBox, you can use Bridged Mode and get on with things, but you can't use bridged mode when installing a VirtualBox image running on a VM with a dedicated IP address. This is because bridged mode requires DHCP which you don't have in this scenario. You can waste a lot of time like I did trying to make it work (or you can tinker with two network adapters, which I didn't want to do) or you can follow these steps, which is what finally worked for me, and I'm quite pleased with the result:
- Follow the canonical directions for installing FreedomBox as given by Debian here all the way up to the point where the directions say to choose Bridged mode. DON'T DO THAT. Instead, Select NAT:
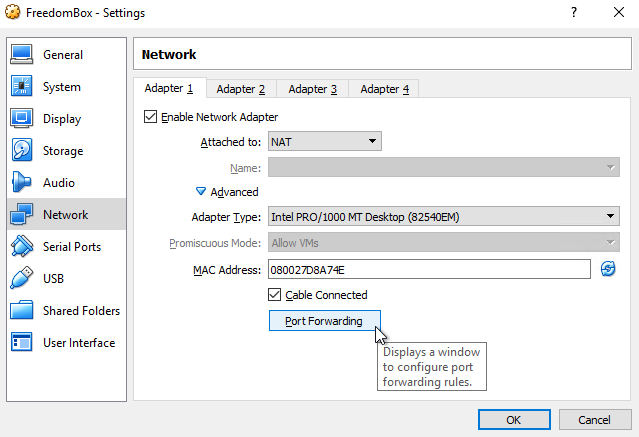
Then, rather than spin your wheels for hours getting nowhere, trying to do this step from the documentation: "Finding out the IP address of the virtual machine," simply use Port Forwarding. Here is how to do it:
- After you select NAT, go down and select "Port Forwarding."
- At first the only port you'll need to forward is 443 for Plinth. Later, you'll enter in as many ports as you want open, but for now, just enter plinth at port 443:
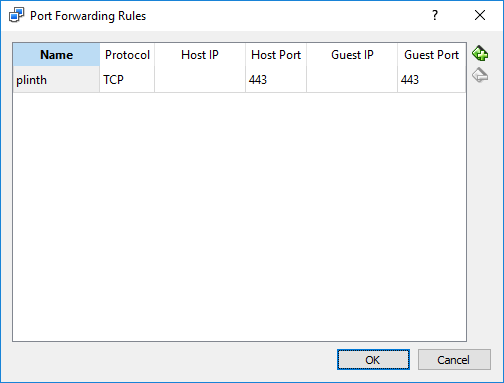
- Once this is in place, when you start FreedomBox, you'll be able to navigate to Plinth by pointing your browser at your external, dedicated IP address... instead of running into pesky frozen black screens and cryptic errors in the logs and wild-n-crazy attempts to do things like load mDNS services from Apple named Bonjour (yes, I tried that), forty-three restarts, Blue Screens of Death, and all kinds of other extravagant time sinks that stand in your way when you believe that Bridged mode must work since the documentation says it should.
Honest, what I'm sharing with you here is an easier way.
-
Once you've got FreedomBox running, and you're happily using Plinth to install and configure the FreedomBox packages you want, nothing will work until you go back and fill in the other Port Forwards you're ready to use. All you do is go back to the Port Forwarding section where you started (with port 443 for plinth as shown above), and add each new port you're wanting to work with. Here's a handy chart on what ports are used by FreedomBox, if you missed it. As an extra layer of security I used non-standard ports on the host, but you can keep it simple and use the same port for both guest and host (just like you did for Plinth above) if you want. Also note, when you get to that point, the orport is gonna change around on you -- it's designed to do that -- so if you're using that port, you'll need to update the port forwarding for it with each reboot of the system. You can script that if you want, but such things are getting out of scope for this discussion.
-
Lastly, but you already knew this, you need to poke similar holes in your host firewall, which other guides can help you do if that's new to you. One thing you can do is allow the whole VirtualBox application to communicate freely with all ports, since FreedomBox is by nature very locked down. However, I understand it's correct paranoid procedure to manage each port separately.
Note, right along in this area, there is another ghastly time sink with a Windows host you may need to escape by either DISABLING your Public Firewall Profile or following the accepted answer at this link from superuser.com.
That should do it, reducing several weeks of 2:00 a.m. hacking, downloading and rebuilding images from increasingly large ISOs, exploring various ways of locking up your host system and calling support, relying on backups, discovering you don't have backups where you ought to, and other techniques related to trying to get Bridged Mode working when it never will... to a mere couple hours of sailing through a FreedomBox install with NAT mode and port forwarding.
Hope this helps someone.