I did this on a Devuan system, which is basically Ubuntu without systemd. This not a well-known distro, so your mileage may vary, but I think it will all work as described on vanilla Ubuntu or similar Debian-based flavors. At the end of this article is a list of URLs I used while putting this all together, you can check into them for tips to get things working if you run into issues.
- Install the required packages:
sudo apt install libpam-oath oathtool qrencode nano
- Generate a 10-digit hexadecimal key:
KEY=$( head -c 1024 /dev/urandom | openssl sha1 | awk '{ print $2 }' | head -c 10 )
- Now write it to /etc/users.oath:
echo "HOTP/T30/6 username - ${KEY}" | sudo tee -a /etc/users.oath
(Replace username with the actual username you'll be using to login. For example: echo "HOTP/T30/6 admin - ${KEY}" | sudo tee -a /etc/users.oath)
- Because you used sudo to create the file, it's already owned by root, which is good because it is a file you want to keep secure. Now protect the file even further:
sudo chmod 600 /etc/users.oath
- Configure use of libpam-oath in /etc/pam.d/sshd. Use the nano editor like this:
sudo nano /etc/pam.d/sshd
Once the file is open, find the line "@include common-auth" which should be near the top of the file. Then add the following 2 lines BEFORE the existing common-auth line:
# Enables one-time-password prompt using libpam-oath.
auth required pam_oath.so usersfile=/etc/users.oath
Ctrl-X to eXit, "Y" to save modified buffer, "Enter" to accept current filename.
Note that we are placing pam_oath BEFORE common-auth so the normal password authentication happens 2nd and thus does not leak information about whether or not the password is correct, as noted here. The very useful instructions at this location provide another way to work around this leak, but this approach did not work for me. If you have issues with my version, try that one.
- Enable PAM in /etc/ssh/sshd_config. Use the nano editor again:
sudo nano /etc/ssh/sshd_config
Find and uncomment these existing lines, or add them if they are not already there. They do not have to be in any particular order and they can be in various places within the file:
Use PAM yes
ChallengeResponseAuthentication yes
Ctrl-X to eXit, "Y" to save modified buffer, "Enter" to accept current filename.
- Restart ssh to activate these changes:
sudo service ssh restart
- Generate a Base32 version of the key, to be used in the qrcode:
BASE32KEY=$(oathtool --totp -v $(sudo grep username /etc/users.oath | cut -d " " -f 4) | grep Base32 | cut -d " " -f 3)
Make sure you change username to the actual username that you used above when creating the hexadecimal key.
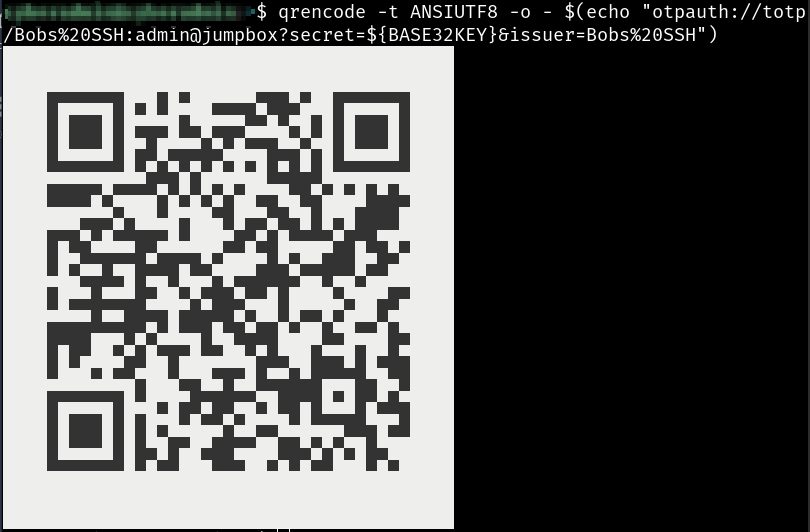
- Generate a visible qrcode to scan with your OTP app:
qrencode -t ANSIUTF8 -o - $(echo "otpauth://totp/Your%20Label%20Here:username@machine?secret=${BASE32KEY}&issuer=Your%20Label%20Here")
(Replace username@machine with the actual username and hostname, as before. Or just use the username. Also replace the Issuer, which can be anything you want. The Issuer name you choose will appear as the label inside your smartphone FreeOTP app.)
Running this command will generate a Base32-encoded qrcode of the HEX-encoded key, and the qrcode will cleverly appear inside your terminal, like this:
- Using the mobile device's camera, scan the qrcode with your app. For example, for the FreeOTP app, simply click on the qrcode icon in the upper right corner and point the camera at your screen.
 That's it! It should be ready for you to log in now.
(Optional step) If you want to be able to connect from your internal network without OTP prompt, you can optionally add the following line to /etc/pam.d/sshd. Place it before the "auth sufficient pam_oath.so" line which you added above.
# skip one-time password if logging in from the local network
auth [success=1 default=ignore] pam_access.so accessfile=/etc/access-local.conf
Then create the following file in the specified location, and add these lines using nano.
sudo nano /etc/access-local.conf

# allow all from local IP range
+ : ALL : 10.0.0.0/24
+ : ALL : LOCAL
- : ALL : ALL
(This assumes your local network is 10.0.x.x, if it's 192.168.x.x, modify accordingly.)
Ctrl-X to eXit, "Y" to save modified buffer, "Enter" to accept current filename.
If you run into any issues, the following links all helped me figure this out. I recommend you look here for tips if it's not immediately working as described:
- https://gist.github.com/andrewlkho/e9a8c996c4bc1df23cd2
- https://wiki.archlinux.org/title/Pam_oath
- https://jonarcher.info/2015/07/hardening-ssh-with-otp-for-2-factor-authentication/
- https://www.linuxbabe.com/ubuntu/two-factor-authentication-ssh-key-ubuntu
- https://unix.stackexchange.com/questions/513011/sshd-denies-access-with-password-google-authenticator-combo
- https://serverfault.com/questions/518802/two-factor-ssh-authentication-on-external-address-only